Many or all of the products featured here are from our partners who compensate us
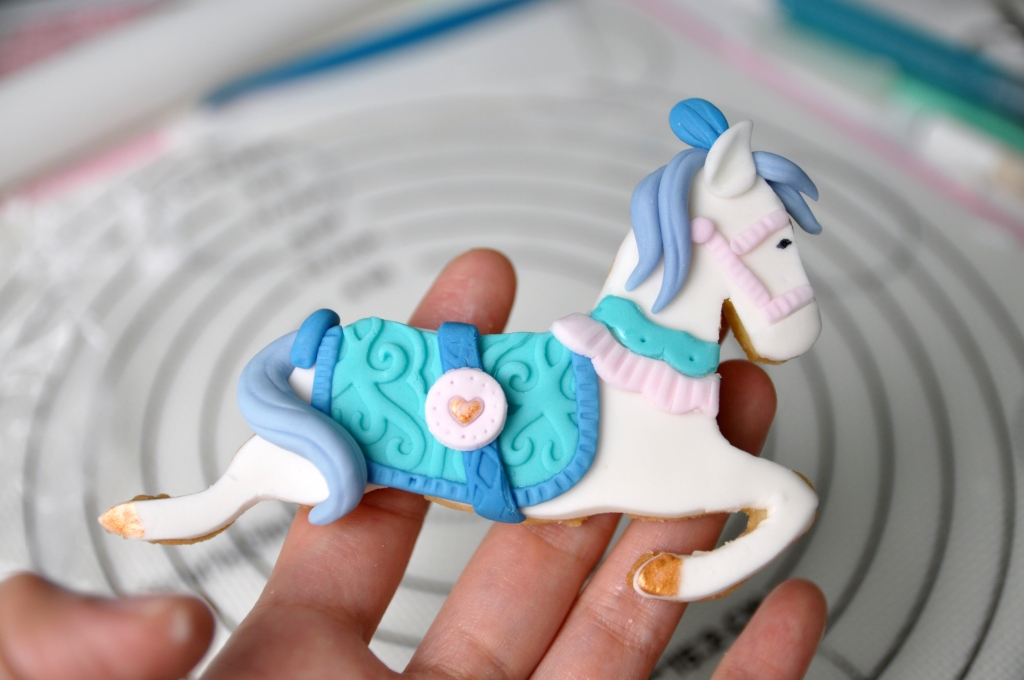
Hi Guys, today we are making something very special “a Magical Carousel Cookies”. This was replicated from my previous cake project that I have designed for my client a few years ago.
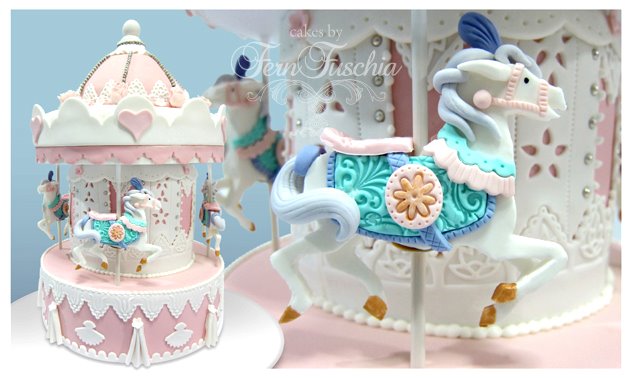
Instead of using cake as a base structure of the design, I’m gonna use sugar cookies for the construction.

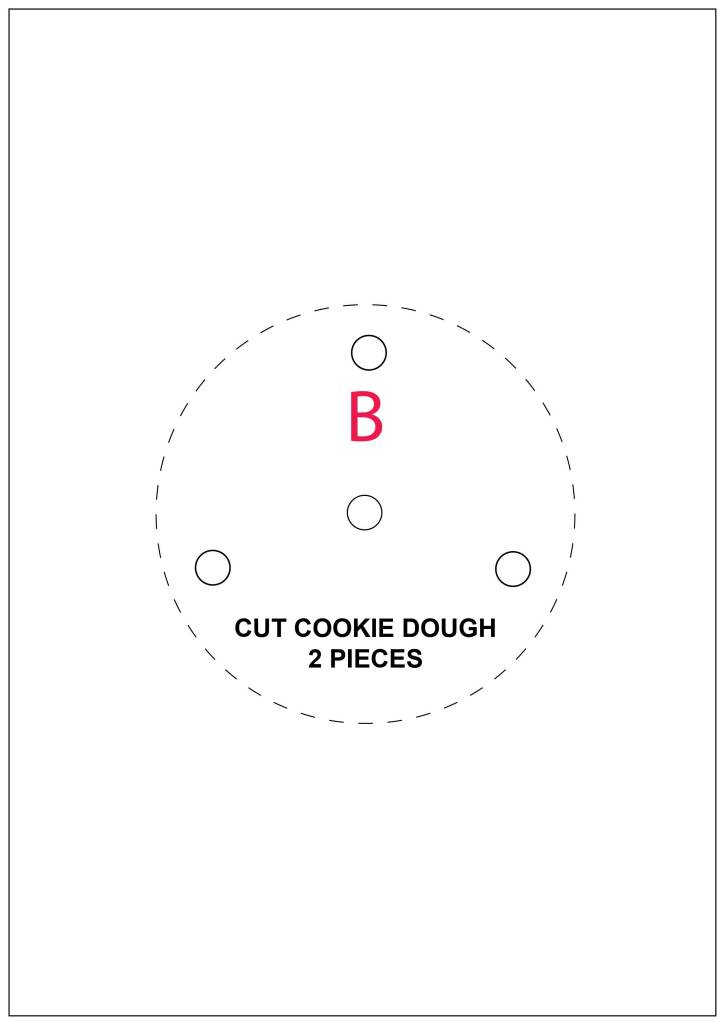
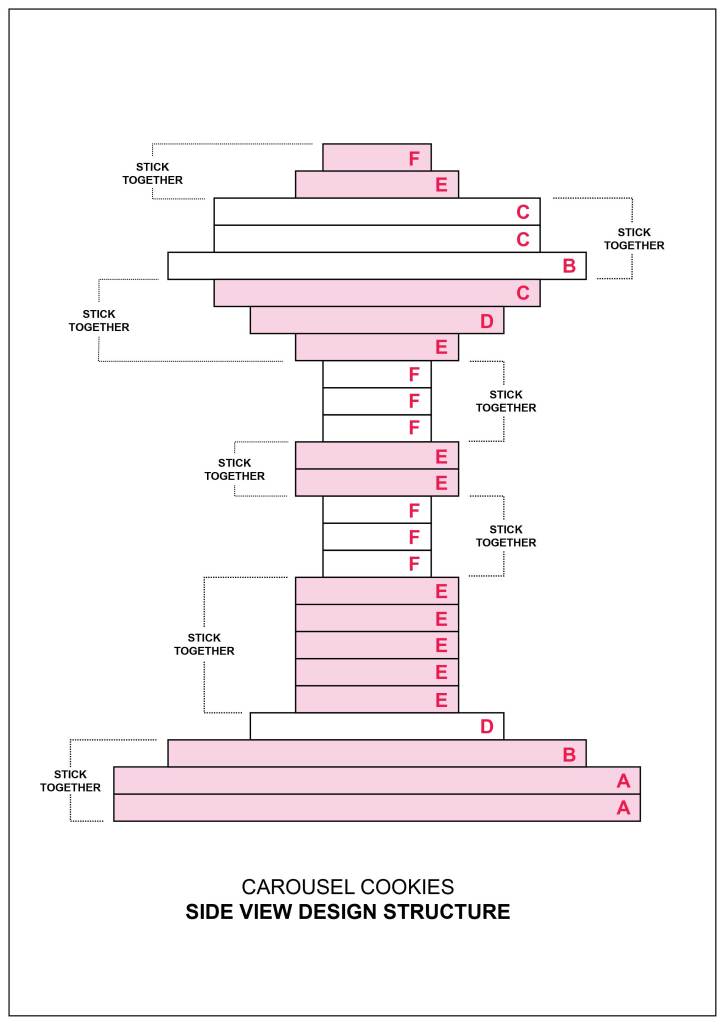
When you had this kind of project, it is very important to start by designing the construction drawing in 2 dimension.

The main purpose of construction drawings is to provide a graphic presentation of what is to be built. It showing the relationship between the components and how they fit together.
This dazzling Vintage Carousel Cookies featuring whimsical Unicorns would make a spectacular gift.

If you are looking for some cookies design that will have a hint of playful and look strikingly attractive just opt for these lovely Carousel Cookies and you are good to go.

This also make a really cool birthday, upcoming christmas or even a wedding present.
You can simplify the design or even change the colour to suit the theme of your party.
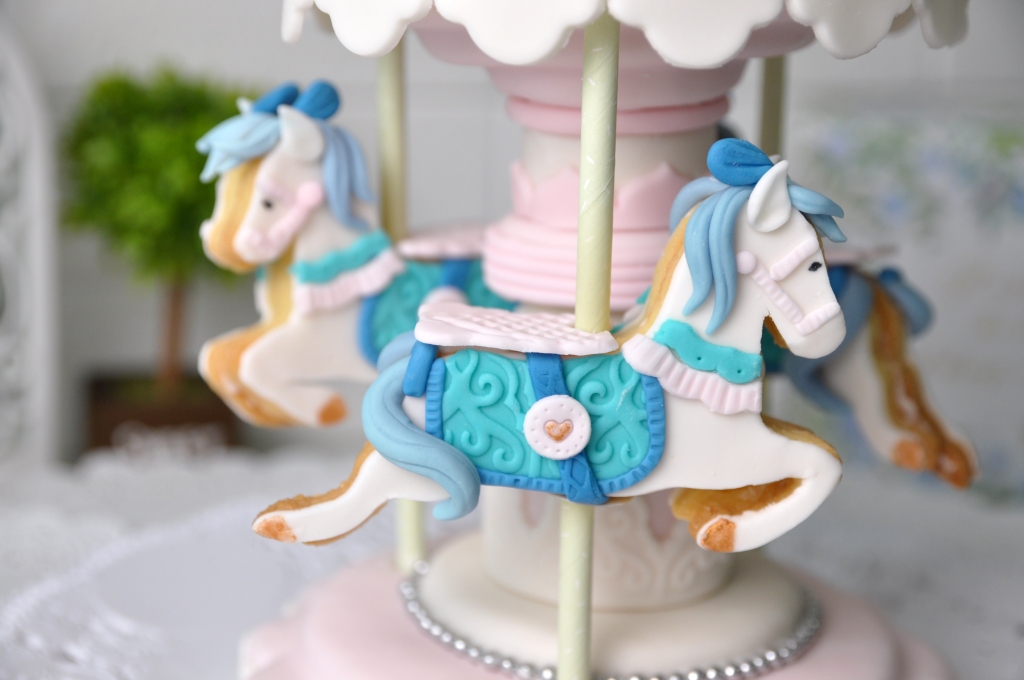
How about A Magical Carousel Cookies for a magical party?
Our Magical Carousel Cookies goes round and round it goes, it looks so beautiful and amazing!
If you keen to make these kind of project kindly find the completed design templates in the description below.

I hope that you will fall in love with this Magical and Dreamy Carousel Cookies as much as I do. Take care Guys, Love you all!
Print the attached files below in a standard A4 paper and simply cut the design out


List of Tools That I Used in Creating This Project
Scissors https://amzn.to/3CEmqk5
Rolling Pin & Cutting Tools https://amzn.to/3V8yH7g
Marzipan Spacers https://amzn.to/3eaqoaB
Round Plunger Cutter https://amzn.to/3e8fYsa
X-ACTO Knife https://amzn.to/3ehZVrw
Dual Sided Cookie Cutter Rectangle https://amzn.to/3V1N9yd
Scriber Needle https://amzn.to/3rBtQyc
Straight Frill Cutter https://amzn.to/3EirQSY
Strip Cutter https://amzn.to/3CCeyPV
Textured Lace Set https://amzn.to/3CcJapQ
Mini Heart Plunger https://amzn.to/3CaYjrO
3D MAGICAL CAROUSEL COOKIES
Yield: 1 Carousel (16 cm diameter, 24 cm height)
Active time: 3 hour
Total time: 5 hour
INGREDIENTS
Sugar Cookies:
- 200 grams Unsalted Butter (soft)
- 200 grams Granulated Sugar
- 50 grams Whole Eggs
- 400 grams All-Purpose Flour
- 1 teaspoon Favorite Extract or Grated Zest (optional)
Marshmallow Fondant:
- 150 grams Marshmallow
- 2 tablespoons Water
- 350-450 grams Icing Sugar
- 35 grams Shortening
- Food Colouring (Rose, Delphinium Blue, Turquoise)
- Edible Pen (Black)
Royal Icing:
- 15 grams Egg Whites
- 100 grams Icing Sugar
- 1/6 teaspoon Cream of Tartar
- 1/3 teaspoon Vanilla Extract
- 1-2 teaspoons Water
Sugar Syrup: 50 grams Granulated Sugar, 50 grams Water
Assembly: Paper Straws, Bamboo Skewers, Small Brush, Gold Luster Dust, Embossing Cutter, Silver sugar pearls sprinkles
INSTRUCTIONS
Design Structure and Templates
Print Side View Design Structure and cookie templates on standard A4 paper, then simply cut all the design out
Sugar Cookies
- In a large bowl mix the butter, sugar and favorite extract or zest until well combined and just becoming creamy in texture.
Do not overwork, or the cookies will spread during baking. - Slowly beat in the eggs until well combined.
- Add in the flour and mix until it creates a dough ball.
- Gather it into a flat disk, wrap it in a plastic wrap and chill it in the fridge for at least 1 hour.
- Trace and Cut
Prepare marzipan spacers for an even thickness (you can use wooden chopstick if you don’t have it on hand), rolling pin, knife, cut off templates and some greaseproof paper for the base of the cookies.
Place the chilling dough on a floured surface and knead it briefly so it’s pliable.
Place the dough on top of a greaseproof paper, using marzipan spacers on both sides and another greaseproof paper on top, roll it out into an even thickness.
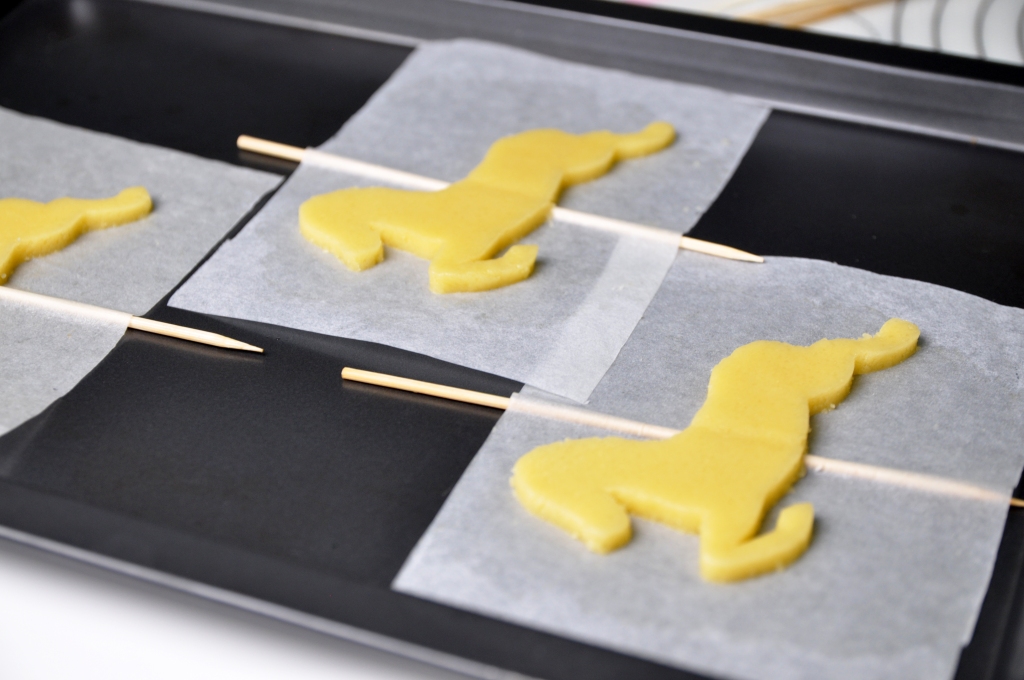
Trace and cut out the shapes according to the templates (to maintain each shapes make sure that every pieces cut on top on their own greaseproof paper that will be bake later). - Lay cut out pieces on a baking tray. Please note, always bake equally sized cookies together to make sure they are cook in the same time.
If you mix different sizes, the small ones are already cooked when the larger ones are still raw in the middle. - Chill the cut out cookies in the fridge for about 30 minutes before baking to maintain it’s shapes, and then bake them for about 8–15 minutes, depending on size, until golden brown around the edges.
- Take it off from the heat, wait for 5 minutes then transfer them to a cooling rack to cool completely.
Marshmallow Fondant
- Pour marshmallows into a microwave-safe bowl or in a double boiler (you might want to grease the bowl and spatula with a bit of shortening before mixing, to prevent stickiness).
Add about 2 tablespoons of water and microwave it in 30 seconds intervals, stirring in between, until the marshmallows completely melted. - Add in ¾ of the icing sugar and mix (you can add any flavouring you want).
After the fondant begins comes together, grease hands and table work generously with shortening, and then turn marshmallow mixture onto the table work.
Add some more left over icing sugar, and continue kneading until it’s form a firm nice and smooth elastic ball (you might need less or more icing sugar).
If it’s a bit dry, add 1 teaspoon of water at a time and if it’s too wet, add a bit more icing sugar. Knead until it feels soft and pliable. - Once it’s done, grease the outside of the fondant with shortening to prevent dryness and then store them in a ziplock bag to keep it moist.
Simple Syrup
Over medium heat, bring equal amount of sugar and water to a boil, turn the heat to low, stir constantly until the sugar dissolves and the mixture is clear and thickened.
Take it off from the heat, pour into a clean glass jar and let it cool completely.
Royal Icing
In a medium bowl, combine egg whites, Cream of Tartar, icing sugar, and Vanilla Extract.
Beat on high speed for 5 to 10 min or until very stiff (feel free to add 1 or 2 teaspoons of water as needed if you fill it’s to thick).
Covering icing in bowl at all times with a plastic wrap to prevent from drying.
Assembly
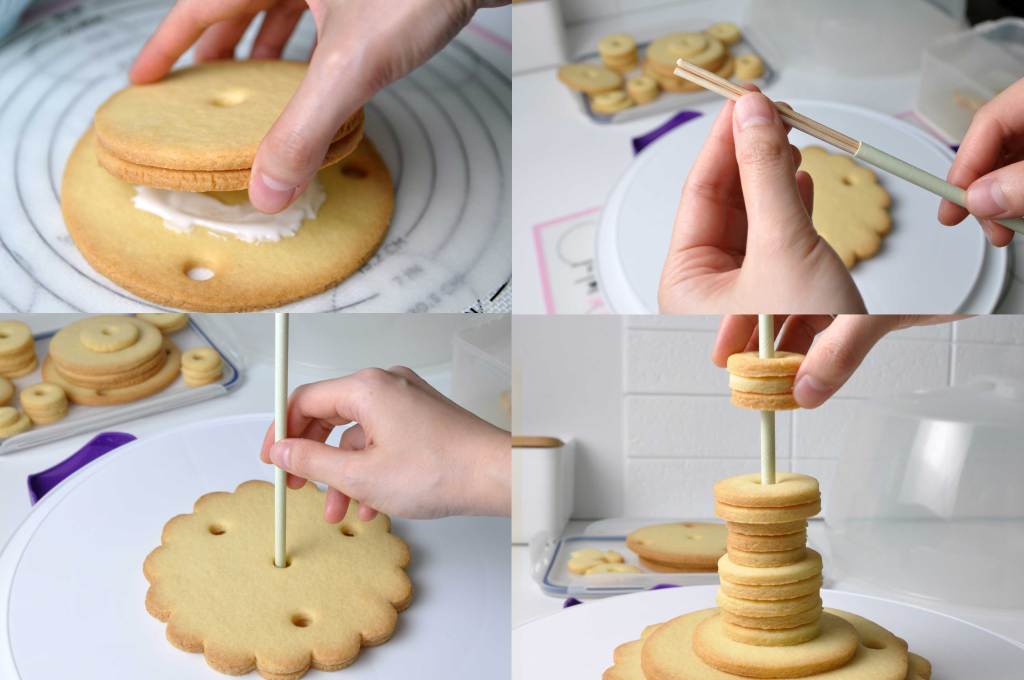
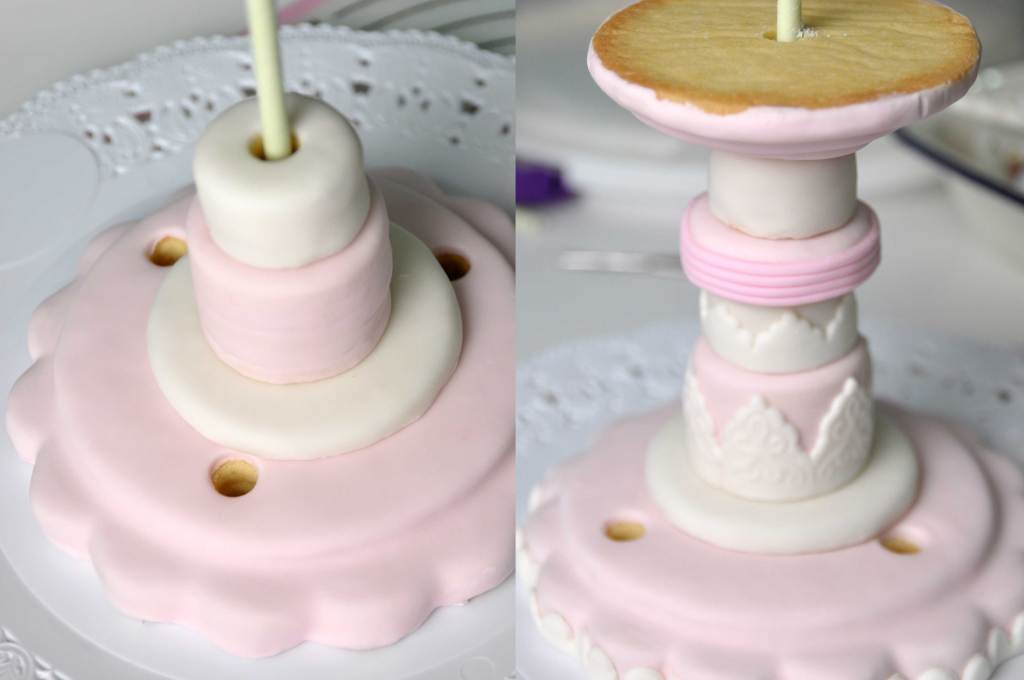
- Group, stick (use royal icing as a glue) and cover baked cookies with fondant (use simple syrup as a glue) according to the “Side View Design Structure” template.
- Decorate the Unicorns.
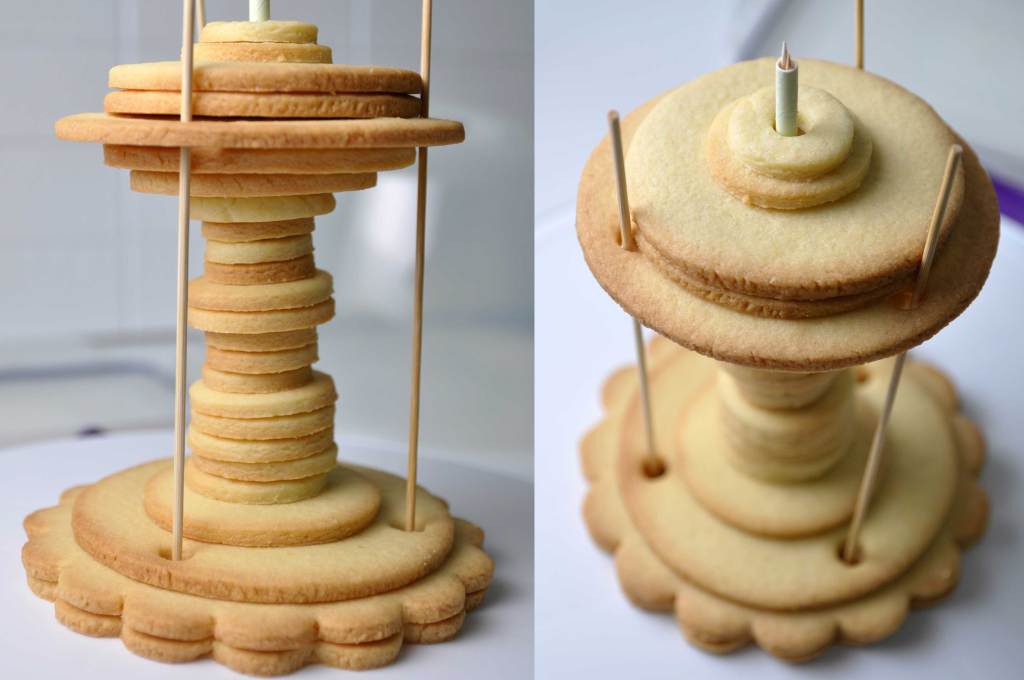
- Place paper straw as Carousel Center Pole (which has been inserted by 2 pieces of bamboo skewers to make it stronger), using royal icing as a glue to assemble and build the cookies group (except for the rooftop).
- Decorate the Carousel Center Pole (feel free to use any embossing cutter).
- Insert another 3 bamboo skewers around Carousel center pole for the Unicorns. Using paper straw (to cover the bamboo skewers) and thick round paper to support the Unicorns.
Using royal icing to fill in the base of the pole.
Place Unicorn on top of round paper, stick both sides together (use royal icing as a glue). - Place and decorate the Carousel rooftop.
- Add finishing details.
NOTES
- To Store Decorated Carousel Cookies; 1 week at room temperature in an airtight packaging.
- To store baked cookies; 1 week at room temperature in an airtight container. For longer storage, pop in the freezer (in an airtight container) for up to 3 months.
- To store Sugar Syrup; keeps for a while in the refrigerator. Eventually mold will begin to grow if stored too long. You can also stir in 1 tablespoon corn syrup to help ensure the syrup stays smooth.
- To store Royal icing; 1 week in the fridge, always cover bowl in a plastic wrap.
